
Summary
Quite often we use a Visual Studio Project for Acumatica custom solutions; even so, a customization project package must still be maintained within an instance of Acumatica. Here’s a simple method of using source control for you projects by exporting and importing changes.
Method
For example, you already have one or more customization project packages in your Acumatica development instance (CST) and you also have a Visual Studio project created and under source control.
You make a change and then create a folder within your VS project. I’m going to call the folder CSTZIP (but you can name it whatever you please.)
As you create and edit various entries within your Acumatica instance project you can periodically export a current project zip file to a location within a folder in your VS solution. The problem here is that when another developer pulls your repository he/she might see a new zip file but won’t have the slightest idea of what might have changed.
A Better Method
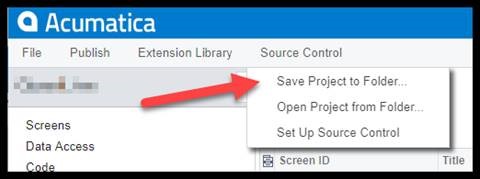
A better approach is to use the ‘Save Project to Folder‘ method. All you need to do is export the project to a folder that you have within your VS project. Simply select ‘Save Project to Folder’ off the Source Code menu and Acumatica will export all supporting entries into text files.
If you export the project to a subfolder called CSTZIP then a new folder with the project name will be created under CSTZIP folder. You can do this for all of your projects individually.
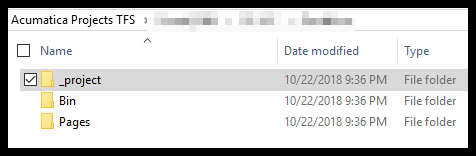
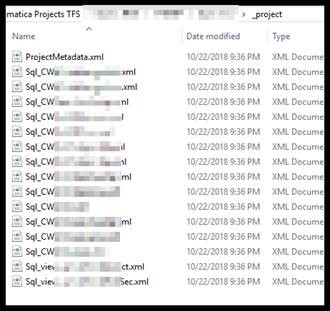
Not only will a copy of your DLL’s and Pages be stored, but also your XML files representing your project entries like reports, site maps, GI’s etc. Once exported you can commit the folder as you normally would in your source control.
The trick here is that the ‘Open Project from Folder‘ will allow you to pull in the entire folder of files directly into your project package. So you will only need to publish the customization to apply the latest changes to your instance.
Now you can manage changes made within these folders as you normally would with your VS files.
Suggested Workflow
As you maintain your solution it might be best to just make changes within the Acumatica instance of the project and after each iteration of changes export your files by using the Save Project to Folder method. Then sync with the repository to merge changes made by other developers. And pull in those changes using the import process mentioned above.
Note: the saving method here will overwrite existing files without prompting, and the open project method in Acumatica will do likewise. This along with how Acumatica remembers where you normally store your export is a great time saver.
For more information, visit Crestwood Associates. Crestwood is an Acumatica Gold Certified Partner, with certified and award winning, in-house resources to help with all your needs.